
Growing some of our own food, medicine, herbs, and flowers and saving their seeds, offers a hopeful and accessible solution that addresses some serious challenges of our time: lack of diversity in our food system, consolidation of food and seed industries, the need for locally adapted crops, breeding for regenerative and local agriculture, and the preservation of culturally meaningful crops. The world needs more growers, and definitely needs more seed stewards like you and me!
We’ve also made a downloadable and print-friendly version linked below!
Planning a Food Garden for Seed Saving
Seed saving can be integrated into your food growing garden and practice with some careful considerations and planning. But it can also be accidental and opportunistic, which is great too. Some basic knowledge is powerful and will make you a better seed saver and gardener. This is an art as much as it is a science. Don’t be overwhelmed, just learn by practicing and making mistakes. Celebrate the victories and enjoy the process!
Here are some considerations to ponder as you learn to integrate seed saving into a food garden.
Will they go to seed where you grow?
Not every plant you can grow for food or medicine will produce seeds in every climate. In North Florida, many biennial plants including brassicas and root crops require extended cold periods to produce seed the following spring, and just won’t be able to produce mature seed where it’s not cold enough for long enough. Similarly, very long season crops will freeze before making seeds up north. Only practice, observation and asking other growers will let you know what is possible in your area (Table 1 at the end of this guide is a start). Before you consider saving seeds, first figure out whether or not seeds are likely to be produced. One way to find out if you can’t get an answer anywhere, is just to observe.
Hybrid, open-pollinated, and heirloom varieties
Generally, we don’t save seeds from (F1) hybrids, as their seeds will not grow “true to type.” Hybrids are great for growing, but not usually for seed-saving (unless you are adventurous and want a plant breeding project).
If the plant is open-pollinated, as long as you don’t let it cross with another of the same species, you can save seeds “true to type.”
Heirlooms are older varieties that have been passed down for generations and still are grown today. With each saved generation they are adapting and changing and should not be considered static or frozen in time. Heirlooms are all open-pollinated, but not all open-pollinated varieties are heirloom. Saving newer varieties of seeds today, means we are saving for future generations of heirloom varieties!
Start Simple!
For new gardeners and/or seed savers, start with an easier to save crop to learn the process. Tomatoes, peas, beans and lettuce don’t typically cross-pollinate and so you can grow fewer plants and more varieties.
Some plants require extra time and space to fully mature to seed. That’s not always available in a home garden. Wee little lettuces for example, can tower to 4′ in full glorious blooms and seeds, leaning over with their accumulated weight. But most growers never see this phase, harvesting lettuce much earlier and smaller.
Some plants are out-crossers meaning they require cross-pollination with others of the same species, sometimes in very high populations. This keeps their genetics diverse and strong. Some actually have mechanisms in place to prevent them crossing with themselves (called self incompatible), thus requiring other plants for pollination and seed production.
Not everyone wants to grow 80+ mustard plants in a small home garden. Some crops like this will be less desirable or even feasible for home gardeners to save. There are some work-arounds, though. For example, you could grow only 20 mustard plants one year, save all the seed and the following year, grow a mix of that seed from the 20 plant population and the original seed. Continue saving and mixing in this way. Also know that for generations most humans in smaller homestead gardens saved what they could, when they could and it all turned out to be okay.
Regardless of what you grow, saving from the largest population of plants as possible is always a best practice for improved seed and plant quality.
Keep in mind that some crops going to seed may take more room in the garden, as they can get very tall and heavy, and perhaps require continued care. Additional watering, fertilizing, staking and pest management are important management activities needed to care for your seed crop.
Most brassicas (collards, arugula, mustards etc.) will take up huge amounts of space in full flower, and their heavy seed-bearing branches may need staking or trellising.
Purity or Promiscuity?
Cross-pollination is a concern if your goal is to keep a variety “pure.” Planting Seminole Pumpkin in the same garden (or neighborhood) as Butternut squash for example will likely result in hybridization, because they are the same species (Cucurbita moschata).
This is only a bad thing if you are trying to keep the Seminole pumpkins pure, which is a noble goal since there are many virtues worth preserving. However if these two crossed with one another, you would get viable seed that grows into edible squash, so there is no harm done. Hopefully you still have some pure Seminole Pumpkin seed to go back to if needed, or you might find your new hybrid is fun to play with year after year as you playfully create your own local adapted squash.
Edmund Frost of Commonwealth Seeds in Virginia is a farmer plant breeder who created the South Anna Butternut: a perfect mash up of these two! Tommy Simmons in Archer, Florida continued to save volunteer squash that he thinks was the result of these two crossing as well, and is known locally as the Bellevue Butternut.
If purity is your goal, you can grow more than one of the same species of highly out-crossing plants by using isolation distancing (see Table 1), or by restricting the flowering of those plants you are not intending to save seed from. For example, you can grow two different varieties of Asian greens that are both Brassica rapa. Save from one, and harvest for food from the other before it has a chance to flower. It only matters if they are flowering at the same time. Of course this only works for those crops whose flowering is not required for edible harvests (i.e. leafy greens, herbs)
If you are growing Seminole pumpkins and butternut squash for example, their flowering is required in order to produce the edible fruit, so you couldn’t cut back flowers from one and expect to get any fruit. In this case, hand-pollinations and bagging flowers can be used, but this requires more time and close attention to detail. There are plenty of videos online demonstrating how to do this if you want to give it a try.
Some growers practice landrace plant breeding. This is the art and fun of letting lots of varieties of the same species cross with one another to create new and diverse varieties. Over time as you save from only those that thrive under your conditions, you develop new and very adapted, resilient crops. This is how Joseph Lofthouse, who farms in the desert climate of Utah, has created several new varieties that thrive on his farm.
His very harsh growing conditions have been unforgiving on most commercially available varieties, so he made his own. This is a great approach for home gardeners, so you don’t worry so much about trying to isolate in small spaces. Judith Bellaire in Gainesville, Florida unintentionally created “Tatzuna” when mizuna and tatsoi (both Brassica rapa) flowered at the same time. The result? Edible greens.
Seeds, Food or Both?
For some crops you can’t always have your cake and eat it too, so to speak. For example, you can’t eat an entire lettuce plant, or harvest from it heavy-handed over the season and expect to save the seeds. But you can eat a watermelon, tomato or pepper and save the seeds.
Eggplants, summer squash, cucumbers, okra, peas, and beans require extra time on the mother plant to reach full seed maturity. But you can eat the other fruits/pods on the plant while saving from just a few selected ones that you allow to grow longer. This will somewhat slow the production of your plant, as she diverts energy into making seeds, rather than more fruit. There are always trade-offs and balances to sort out.
Select the Best and Eat the Rest!
When you save seeds, remember to always be picky. Select from plants that have performed the best throughout their season, or have a specific quality you are trying to preserve. Our top two criteria are flavor and vigor. Does it taste great and grow well? Yes? Save it! There is no reason to save seeds from a plant that didn’t perform well or that you don’t enjoy eating.
This is the precise time when your growing practices should deepen, and make you a more
observant participant in the process. Did a particular plant or group of them do poorly because they just happened to be in a challenging part of your garden that you may not have been aware of? Or because the variety itself was just not a winner? Make sure you’re not assuming it’s the plant’s fault when maybe it’s yours!
Here are some thoughts about the selection process:
If possible, start with way more plants than you want to save seed from and/or eat. Figure out optimal population size for your crop and plant more (see Table 1). As the season progresses, remove the plants that are not doing so well before they have a chance to flower (eat them instead). By the end of the season, considering losses from bugs, squirrels, and your dinner, you still have a good size population of plants to save seed from that are also thinned out a bit which is good for those plants that will get quite a bit bigger as they move into seed maturity. So if your population goal is 20, plant 30. Maybe by the time flowering commences and seed season begins, you’ll still have all 30 plants, or more than likely you’ll be closer to 20.
Save from individual plants that have the qualities you adore the most. If you like the flavor, texture, shape, productivity, slow bolting or color of something in particular, be sure to save seeds from that plant. For example, we always save from lettuce plants that bolt the latest and don’t taste bitter (unless you like bitter). Think about how you can easily distinguish those plants: bright flagging tape or orange fiberglass driveway marker poles are our favorite.
Look for odd-balls that are unique (or in the seed lingo world, the “off-types”) and if you think they are cool, save them separately and be sure to label them. This could be the start of creating a new variety. This is how the local tomato Conie Pink (pronounced coo-knee) was discovered at Hammock Hollow Farm in Island Grove, Florida. Conie was working the tomato fields and spotted an odd ball that stood out for vigor and flavor, and was saved each subsequent year.
Sometimes, it’s as easy as only saving from the plants that stayed alive long enough to produce seeds. If your tomatoes all bite the dust before you have ripe ones to eat and save, but one plant makes it, well that’s a keeper and it was your only option anyhow!
Be sure to label all your seeds when they come out of the garden. If you start selecting for special things too, label and keep separate. Masking tape and sharpie work the best for nearly every situation.
Seed Processing
There are two main categories of seed harvesting: wet and dry.
-
This includes tomatoes, peppers, watermelon, ground cherries, cucumbers, pumpkins, etc. Extracting and cleaning the seeds often requires scooping out seeds, cleaning, and rinsing to separate from the fruit.
For wet seeds, the basic process is to harvest your fruits and simply scrape out, scoop, separate and rinse the seeds from the fleshy bits. There are of course nuances with each crop type. Tomato seeds should be fermented before drying and storing, and we recommend it for squash too. It cleans them up nicely and removes potential pathogens and mold. Bad seeds float to the top, heavy viable seeds sink. Sometimes with squashes, good seeds will float. Press down on each seed. If they feel firm they are probably okay. Bad seeds are fairly obvious, they will not have much substance to them, squishing easily.
-
This includes okra, beans, peas, brassicas (broccoli, collards, radish, arugula etc.) and peanuts. Or they may be exposed right on the plant like many grains, herbs, and flowers, where they easily fall from the plant to self-sow. These require some quick handling to catch them before wind, birds or rain carry them off or destroy them.
Dry seeds all vary, but can be as easy as waiting for seeds to dry and mature on the plant and gathering them. Sometimes with our humidity and rain, pulling seeds indoors early to dry under a fan is necessary. There are lots of instructional videos online to see how others process their seeds.
Seed Drying & Storage
The most important thing is to get your seeds DRY, the ultimate challenge in the humid Southeast. Humidity is the #1 killer of seed longevity. Just leaving them on our counters to admire in the house is not okay unless you are planning to plant those seeds the following season. For any length of storage, whether a month or years, getting them into a dry and stable environment to rest is critical. Especially if you want to preserve them for a few years or share with others.
Many garden seeds will be fine for 3-10 years if you can get them cool, dark, dry and stable.
Anything different will encourage decay, and sometimes devastating outbreaks of weevils and other seed pests. We have found excellent germination rates on seeds many years old because we have kept them well. This means you can save some crops only once every few years rather than every year.
For larger seeds like a pumpkin, if you can easily snap it in half, it is pretty good and dry. You’ve done well! Get them in a tight jar, label and store. If it bends or resists a snap, you have more drying to do.
For seeds like corn or beans, if you put one seed on a hard floor and smash it with a hammer and it shatters, it is pretty good and dry. You’ve done well! If it smooshes, you have more drying to do. Very small seeds tend to dry fairly well in ambient conditions compared to large ones, but still benefit from a full dry down. They are too small to snap or smoosh.
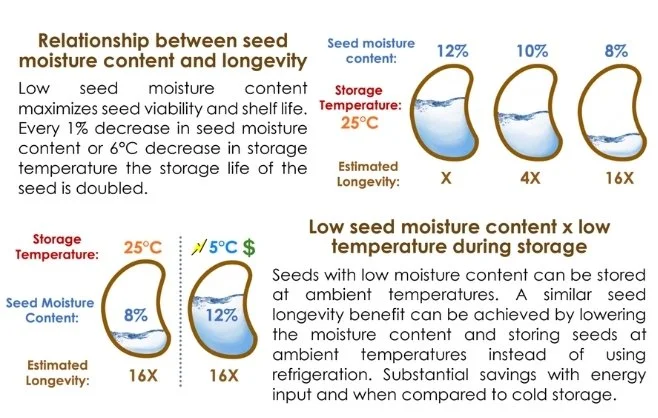
Aim for 35% relative humidity or lower. Our ambient conditions in Florida range throughout the year from 50%-100%, depending on the season. Seeds will equilibrate with their environment, and high seed moisture content is terrible for seed longevity. We borrowed this graphic below from our friends at Dry Chain America. Lower temperatures are good too, but not as effective as lower moisture content.
Supplies
Additional supplies, although very basic, are sometimes needed to stake heavy seed-bearing plants, and to process, dry and store seeds. When you are just getting started you probably won’t need much more than what you might already have in your kitchen. But as your practice grows, getting the right tools will make the work easier and more efficient. Thrift stores often have cheap screens, colanders, baskets and such.
Some of our simplest tools for the job include:
Box fans are great for blowing over your seeds for a few days to get bulk material dried down. Often we have a huge mound of mustard or bean seeds we’ve pulled from the field that need to dry more before we can pull the seeds off and start cleaning them up. We place them in front of box fans and rotate the pile every day.
We pile seeds over a tarp or sheet to collect the falling seeds keeping them off our dirty floors.
Drying wet seeds on a paper plate or coffee filter that is labeled are the only two kinds of paper we recommend. All other types end up with seeds stuck to the paper, which is a huge pain. We collect an assortment of flour sack towels and cloth napkins that work wonders and are very affordable. Every day as seeds dry you can easily scrape them free and move them around till they are fully dried.
Mason jars or other tight fitting jars and containers with a rubber seal are inexpensive and infinitely reusable. Keeping out air and moisture are important, thus the rubber seal or gasket. If you have a vacuum sealer you can remove the air from a plastic storage container or jar and get even more longevity. We like clear jars because we can stick drying beads and indicator tape inside to help us gauge our dryness, and look at our pretty seeds! However they must be kept somewhere dark since continual light exposure is not recommended.
Humidicator tape - This simple and inexpensive roll of tape can be cut off into small pieces and put inside your seed storage jars, giving you a color indicator of how dry they are.
Hygrometer - We keep a couple of these hygrometers around, one in the open air just as a frame of reference for our ambient conditions, and one inside our seed storage room or containers, so we know how dry it is in there.
Drying beads - We have used silica beads over and over again for years. Place beads inside a mesh bag and inside a tight jar with your seeds. Approximately the same weight of beads to seeds. Usually you put either the beads or seeds inside a mesh bag to easily separate them. With a humidity strip also placed inside the jar you can watch the humidity drop. Beads are removed when seeds are dry, and you can replenish them by baking in the oven. A safer and more environmentally friendly option are clay zeolite beads, but they can be harder to source.
Once your seeds are dry, they can safely go inside an airtight and leak proof container somewhere cool, dark, dry and stable. A home refrigerator is really not necessary and in fact may cause more harm if improperly stored. They tend to be humid and the continual opening and closing of the door is a lot of fluctuating temperature and humidity. Well dried, in a sealed jar in the back would be acceptable.
A home freezer is great, preferably in the back where conditions are more stable. A dark closet, or under the bed in an air-conditioned home is also good.
If you freeze your seeds, when removing them, let the container come to room temperature BEFORE opening the jar. The dried out seeds will act like sponges for moisture so let them rest and thaw, then open. If you are very quickly just getting out a small sample to return the rest to the freezer that’s fine. Hurry!
These are all tips to extend the life of your seeds. If you only have a few and are planting them the next season, it might not be necessary to strive for such perfect storage conditions. That said, even with fresh seeds we’ve noticed big germination differences between seed handled and stored well shortly after harvest or purchase, and those that have not.
Have Fun!
Remember this. Although you have been given a lot of information here and it may seem overwhelming, seed saving is an ancient and intuitive practice. Humans have been doing this for thousands of years without degrees in plant biology or breeding! Be curious, observant and brave. You will make mistakes. That’s OK, it’s how we learn. Have fun and don’t sweat the details. Take lots of notes and photos. You and the seeds will work together beautifully.
Resources for More Learning
Books
Breeding Your Own Vegetable Varieties by Carol Deppe
Landrace Gardening: Food Security Through Biodiversity and Promiscuous Pollination by Joseph Lofthouse (book and free online course)
Seed to Seed by Suzanne Ashworth
The Organic Seed Grower by John Navazio
The Seed Garden - The Art and Practice of Seed Saving by Seed Savers Exchange
The Seed Underground: A Growing Revolution to Save Food by Janisse Ray
Organizations
Working Food has several free seed saving resources: workingfood.org/resources
Organic Seed Alliance has numerous free growing, breeding, and trialing publications available online: seedalliance.org
Southern Exposure Seed Exchange has many free resources available online: southernexposure.com