Home-Grown Tomatoes in the Southeast
Tomatoes are one of the most popular garden vegetables and there’s nothing like the flavor and pride of a home-grown tomato! But our southeastern climate can be a challenge for growers. Insects, disease, heat, and humidity can be sources of great frustration. This guide is a compilation of years of experience gathered from growers in Florida. Through trial and error, success and failures, we've learned a few things we’re excited to share with you!
We’ve also made a downloadable and print-friendly version linked below!
TOMATO TYPES AND TERMINOLOGY
Growth Form
-
Determinate tomatoes have a set growth period and produce all their tomatoes around the same time. This is good for gardeners that want a known end to the season, want to preserve the harvest, and use smaller equipment for staking/trellising.
-
Indeterminate tomatoes have extended growth and production throughout the season, and tend to be much larger plants, requiring adequate trellising or other support.
-
Dwarf tomatoes are relatively rare but many new varieties are available thanks to the Dwarf Tomato Breeding Project. They are much more stocky and compact in nature, typically with very rugose and dark green leaves. They do not grow out of control like indeterminates and are great options for space limited gardens. The term “dwarf” applies to the plant, not the fruit size which can range from cherry to huge beefsteak-sized fruits.
Heirloom, Hybrid & Open-Pollinated
-
Heirlooms are older varieties, having been around over a few human generations of stewardship. There are many varieties of all shapes, sizes and colors. Seeds can be saved for next season's tomatoes. Many have been preserved for flavor or particular uses, but not necessarily acclimated for our area. Disease pressure can be high or production low, depending on the variety.
-
Hybrids (F1) are bred for disease resistance, high production, and other commercial qualities. Flavor is not always a concern for hybrids as other traits like shipping tolerance, productivity, shape, firmness, and color take priority. You can save the seeds but cannot expect to get the same plant next year. They do not come “true to type” and you must purchase new seeds each year.
-
Open-Pollinated (OP) varieties reproduce naturally and have stable genetics which means when you save their seeds, the plants grown from them will be “true to type”. For gardeners, this means you can reliably save seeds and replant them year after year, preserving desirable traits and adapting plants to your local growing conditions over time. All heirlooms are OP, but not all OP are heirloom, if they are newer varieties.
Fruit Size
Currant - the smallest tomatoes, about the size of a pea. Good for garnishing, salads, fresh eating, and snacking.
Grape - oblong like a grape and about the same size. Usually eaten fresh and on salads and typically sweet.
Cherry- small and round averaging 1″ diameter. The most common use is whole in salads or fresh eating.
Pear - pear-shaped and about the same size as a cherry tomato.
Plum/Paste - oblong and drier fruits used in pastes and sauces.
Slicing/Globe - medium-sized fruit commonly found in grocery stores. Perfect for sandwiches and salads, hence their name – slicers. They are also great for preserves.
Stuffer - internal hollow structure great for stuffing and baking.
Beefsteak - the largest sized and prized by many. Can be over 2 pounds, depending on the variety. Typically harder to grow in warm climates.
Seeds or Transplants?
Transplants offer a head start and can save valuable time in the growing season. Look for plants that have been properly hardened off, are not rootbound, appear healthy, and are well-suited to our region. Seeds open the door to an almost endless selection of varieties and give you full control over how your plants are grown from the very beginning. They do require more time and carry a bit more risk, as success depends on having the right setup and conditions for germination and early growth. Seeds are much cheaper than plants.
Tips for Picking Good Varieties
In addition to considering growth habit, fruit shape, size, and other characteristics, take time to carefully review each variety before you chose to grow it.
Choose varieties with shorter days to harvest, since longer-season crops have a greater chance of encountering pests, disease, or weather-related challenges. Look for varieties that are well suited to hot, humid climates, and prioritize disease resistance whenever possible.
In Florida, smaller-fruited varieties are generally easier to grow, while large slicers and beefsteaks tend to be more challenging. Cherries usually do very well, whereas large beefsteaks, do not.
It also helps to define what success means to you—whether that’s a pantry full of canned tomatoes, discovering a new favorite variety, or simply enjoying fresh slicers and salad tomatoes. Be realistic about your growing season, including how long you have and how much time you can commit, as tomatoes can require consistent attention.
Consider your available space and avoid planting more than you can comfortably maintain. If you’ve experienced disease issues in the past, choose varieties with resistance or tolerance to those specific problems.
Seed Starting
With a greenhouse, seeds can be started in January or early February, and seedlings should be potted up into 4-inch containers as needed. At this size, plants can often be transplanted outdoors.
Without a greenhouse if you’re growing indoors, seeds can be started earlier in mid to late December. They will also need potting up into larger containers when they’re ready.
Seedling growth rates will vary depending on light, temperature, and other conditions, which will determine how often, and when re-potting is needed.
Planting outdoors into the garden, happens late February through the end of March. However, frosts can still occur as late as April, so protection may be necessary.
Germination and Potting Soil Mixes
Always use a germination mix rather than potting soil or compost when starting seeds, as these sterile blends support healthy seedling growth and help reduce disease problems. Avoid Jiffy Mix from big box stores, as it is often old and can become hydrophobic. Similarly, pre-made peat starting plugs tend to be very hydrophobic and of inconsistent quality.
When potting up seedlings into larger containers, you can switch to a standard commercial potting mix. Some growers make their own by combining roughly equal parts potting mix and compost. You can add other good amendments like worm castings and small amounts of fertilizers.
At this stage, a slightly chunkier mix is ok to use if that’s what you have. Established plants can handle it well, while young seedlings require a finer texture to support delicate root and shoot development.
Sowing Seeds
Sow 1–2 seeds per container using small cells or pots such as 2.5 x 3- inch containers, 6-packs, or seedling flats (we prefer 50 or 72-cell trays). Whatever you have on hand is fine, but smaller containers are best—starting in large pots is not recommended.
As seedlings grow, gradually pot them up, first into a 4-inch container, then into ½- to 1-gallon pots if needed, or transplant them directly into the garden from the 4" pot if the timing works.
When reusing containers, clean them thoroughly and sanitize with a solution of 9 parts water to 1 part bleach to reduce disease risk.
Germination Success
Check the seed packet date to ensure seeds are fresh. Seeds older than five years, or those stored under questionable conditions, may have lower germination rates. Sow more thickly if needed to compensate. Germination typically occurs within about 7 days, though timing varies by variety and growing conditions.
A good rule of thumb is to plant seeds no deeper than their width. Tomato seeds, in particular, should be sown very shallowly, as these small seeds do not have enough energy to push through much soil.
Maintain warm soil to encourage germination. A clear plastic dome used for the first few days, along with a heat mat, can help significantly. If both are used, monitor temperature and humidity closely and ventilate by removing the cover if conditions become too warm or humid.
Heat mats are highly recommended, as they improve germination rates for tomatoes and other warm-season crops like peppers. Keep seed trays consistently moist, but not overly wet, since drying out will reduce germination success.
Some wilder types, such as Everglades and Coyote, can germinate sporadically over several weeks. Soaking seeds in shallow warm water for about 8 hours before planting, and using a heat mat can help improve and speed germination.
Airflow & Spacing
Airflow is very important for healthy seedlings. Plants should have regular exposure to moving air, such as a gentle fan or natural wind each day. This helps reduce disease and pest issues while also encouraging stronger, sturdier stems. When plants must resist movement from air, they develop more strength and resilience.
Proper spacing between seedlings is also important. Well-spaced plants benefit from improved airflow and reduced competition for light, which helps prevent them from becoming tall and spindly.
A fun thing to do is to gently run your hands over seedlings for a few minutes each day. It will further strengthen stems and improve overall plant resilience.
Lighting
Tomato seedlings need plenty of light. Insufficient light leads to leggy, weak plants that struggle to support themselves. Aim to provide about 10 hours of bright, direct light each day.
Windowsills are often not sufficient unless they receive strong, direct sunlight for most of the day. If using one, rotate seedlings regularly to encourage even growth.
If you don’t have a well-lit, ventilated greenhouse, place seedlings outdoors in full sun whenever conditions allow. Indoor grow lights are also an excellent option and can be set up in many ways. Keep lights positioned close to the seed trays at first, then raise them gradually as the seedlings grow.
Common Problems
Damping off is a fungal disease that kills new seedlings. It is caused by overly wet and cool conditions. Over-watering is the primary cause, but is worsened when there isn’t enough light, and poor airflow.
Helmet head is when the seed coat gets stuck to the emerging seedling. Ensure you are using fresh seeds and water regularly. If it’s not too stuck you can gently remove the seed coat to release the leaf tissue.
Lanky seedlings are probably not getting enough light.
Potting Up & Seedling Maintenance
Wait until seedlings have developed their first set of true leaves— ideally until the second set is beginning to form, before transplanting. Don’t wait too long, however, as allowing roots to fully encircle the container can lead to root-bound plants can become stressed and unhealthy.
Plant only one seedling per container. Keeping multiple plants together will slow the growth. They can carefully be separated and potted up, or one can be snipped carefully at the soil surface to remove.
Remove late-emerging or noticeably smaller seedlings, as these are often weaker and are unlikely to perform as well, making them a poor use of time and resources.
Fertilizing Seedlings
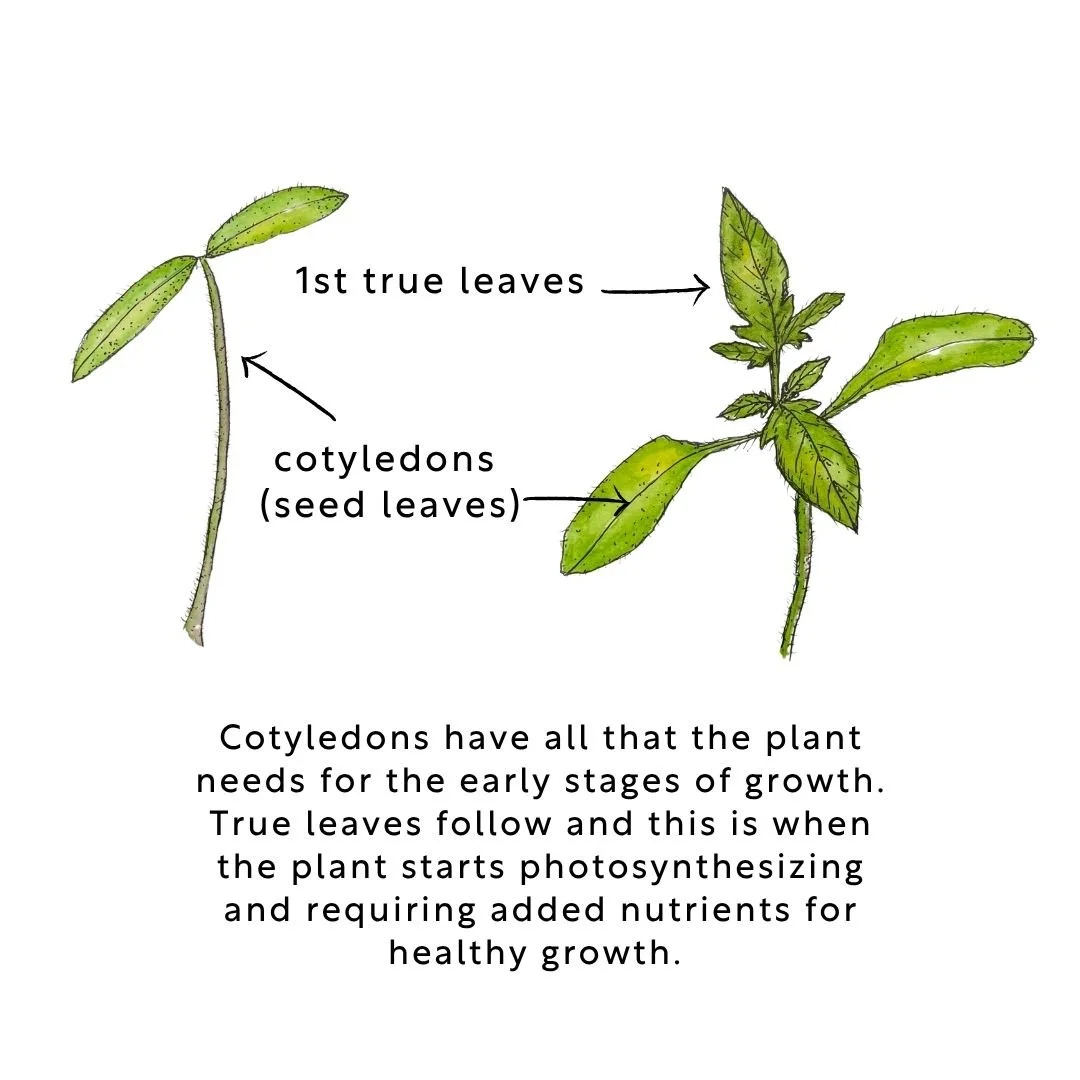
The plant relies on the nutrients stored in its seed leaves (cotyledons) until it is ready for its first transplant, when true leaves begin to form. At that point, when repotting into 4-inch containers, apply only a small amount of a mild fertilizer—anything lower than a 10-10-10 formulation —used sparingly at about 1 teaspoon or less per plant.
Diluted foliar sprays, such as compost tea or fish emulsion, can also be used to gently support seedling health and vigor. While not strictly necessary, applying mycorrhizal spores to the root zone during repotting or transplanting can help establish a beneficial relationship between plant and fungi, often improving nutrient uptake and overall productivity.
Hardening Off Before Planting Outdoors
Seedlings need to gradually experience outdoor conditions. including cooler nights, warmer days, wind, and stronger light—before being planted in the garden. This process, known as hardening off, helps prevent transplant shock.
How much hardening off is needed depends on how the seedlings were grown. Plants started indoors in lower light are more sensitive and require a gradual transition to outdoor conditions. In contrast, seedlings grown in a greenhouse or other semi-outdoor setting may already be partially acclimated and need less hardening off or none at all.
For indoor or greenhouse-grown plants, using an oscillating fan can help strengthen stems and improve airflow, resulting in sturdier, more resilient plants as they transition outdoors.
Planting Outdoors
Once the danger of frost has passed, seedlings can be planted in the garden.
In North Florida, the average last frost date is around March 15, though light frosts can still occur into mid-April. If planting earlier, be prepared to cover plants on cold nights or bring them indoors if they are in containers.
Tomato plants begin to experience cold damage below 45°F. While they may survive above freezing, growth will slow and leaves may be damaged, needing removal a few days after the damage becomes noticeable. Temperatures below 32°F will typically kill the plants, and they will not recover.
When transplanting, remove lower stems and plant deeply, burying the stem up to the next lowest branch. Tomatoes will form roots along the buried stem, resulting in stronger, more resilient plants.
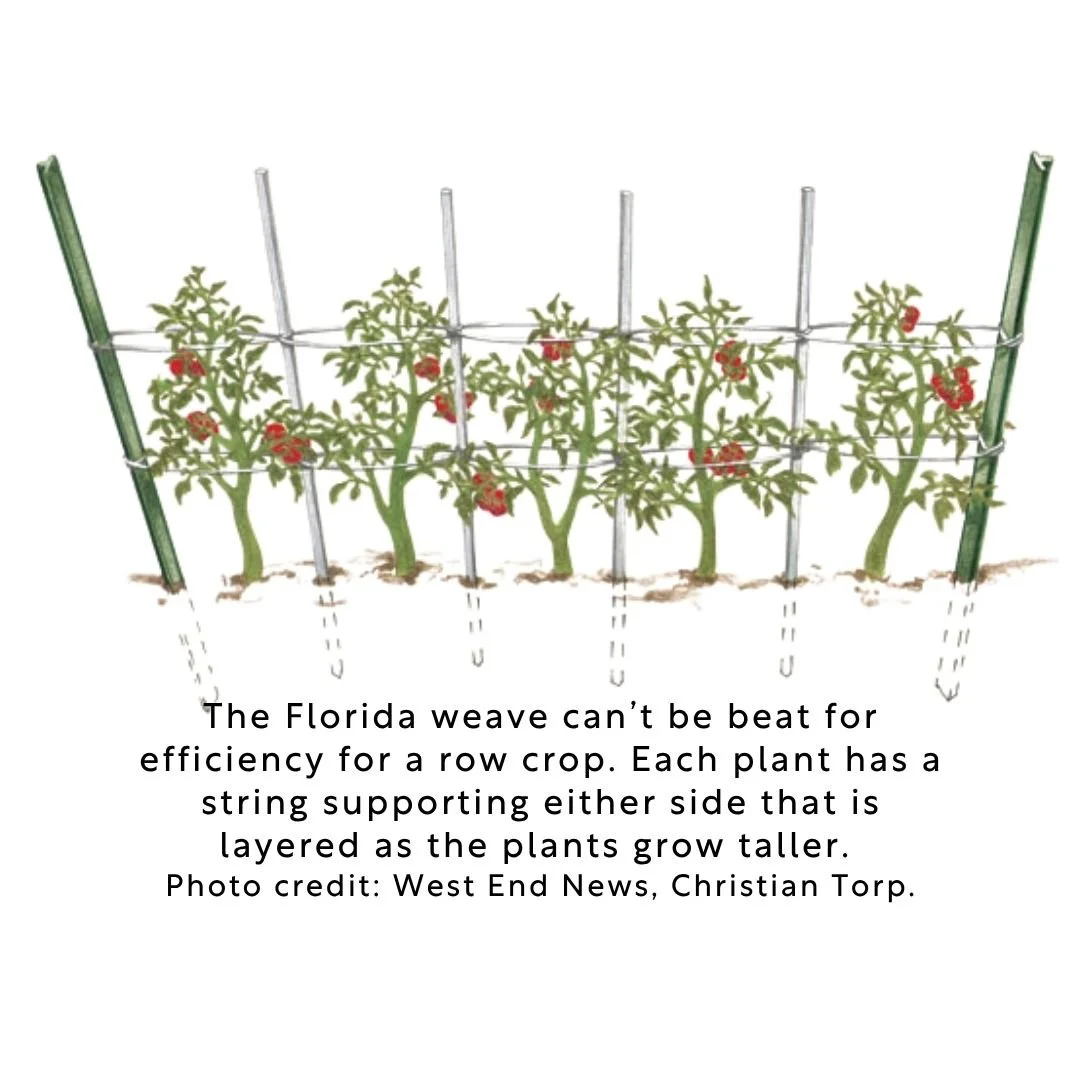
Space plants about 3–4 feet apart, depending on the variety. If you plan to use the Florida weave, planting in a straight row is very helpful, to make the trellising easier.
For added nutrition and nematode management, incorporate a handful of crab meal into the planting hole (about 1 cup per gallon-sized pot equivalent).
Water thoroughly after planting and continue consistent watering during the first week or two as plants establish.
Finish with a layer of mulch such as straw, pine needles, or leaves, to conserve moisture and reduce soil splash up onto the plants, which can help limit disease.
Fertilizing & Irrigating
Tomatoes are fairly heavy feeders and perform best in well-enriched soil with plenty of compost, along with occasional supplemental fertilization. If compost is applied well and plants are side-dressed a couple of times during the season, additional fertilizer may be minimal.
An ideal fertilizer ratio is approximately 1:4:2 (NPK). Avoid excess nitrogen, which promotes leafy growth at the expense of fruit. A modest boost of phosphorus, such as bone meal or rock phosphate can encourage flowering and fruit set. Florida soils tend to have plenty of this however, so it may not be necessary unless growing in containers. Container-grown tomatoes require more frequent fertilization and watering than in-ground plants due to faster nutrient and moisture loss.
Consistent, even watering is essential and will vary based on soil type, mulch, plant size, and growing method, with drip irrigation being an excellent way to maintain steady moisture. Some mid-day wilting is normal, but if plants do not recover by evening, they likely need more water or additional mulch to retain moisture and cool the soil. Whenever possible, avoid wetting the foliage during watering, as excess moisture on leaves can contribute to disease.
Staking & Support
All indeterminate tomato varieties should be supported to reduce disease risk, encourage healthier growth, and make harvesting easier. Dwarf and determinate types are generally more compact and may require little or no support, depending on the variety.
Standard tomato cages are often not recommended, except for very small plants, as they tend to be too small or not sturdy enough to support a vigorous, productive plant. Instead, individual staking or the Florida weave system are preferred, as both provide stronger, more adaptable support throughout the growing season.
Some growers like an overhead string trellis system that has one string per plant attached to an overhead pole and into the ground or pot. Plants are clipped or tied to the string as they grow, and heavier pruning is typically applied.
Pruning
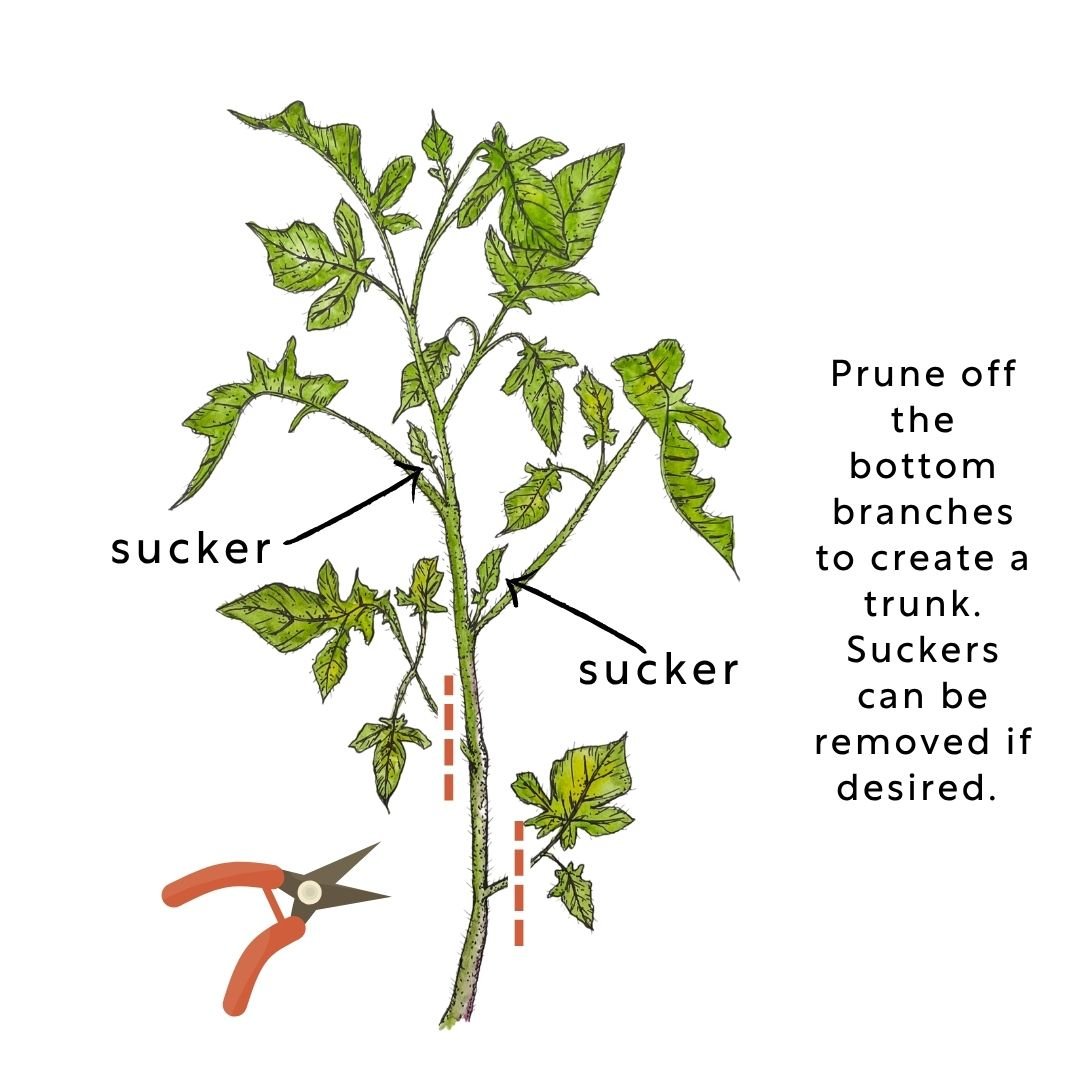
Keep plants pruned to reduce disease pressure and improve airflow. Begin by removing lower branches early in the season to maintain a clean trunk and prevent foliage from touching the soil, where disease can develop more easily.
Suckering (removing the shoots that grow directly in the v-shaped nook between stems) is not necessary for dwarf or determinate varieties, although lightly thinning dense growth can still help. For indeterminate types, selective suckering improves air circulation and helps manage vigorous growth. Balance is important—removing too many suckers can reduce yield since suckers do grow into fruit-producing branches. It’s best to remove shoots while they are small and tender so they can be pinched off easily, as cutting larger suckers can unnecessarily wound the plant.
Pruning is as much an art as it is a science. Step back and look at the plants before each cut. Try to remove branches that are causing crowding or touching the ground. Try to prune plants in a way that you can see through them. This may be done 2-4 times early in the season, and periodically afterward if needed.
Topping, or removing the growing tips, can be done late in the season to redirect energy toward ripening existing fruit, rather than the plant spending its waning energy on more leaves and fruit.
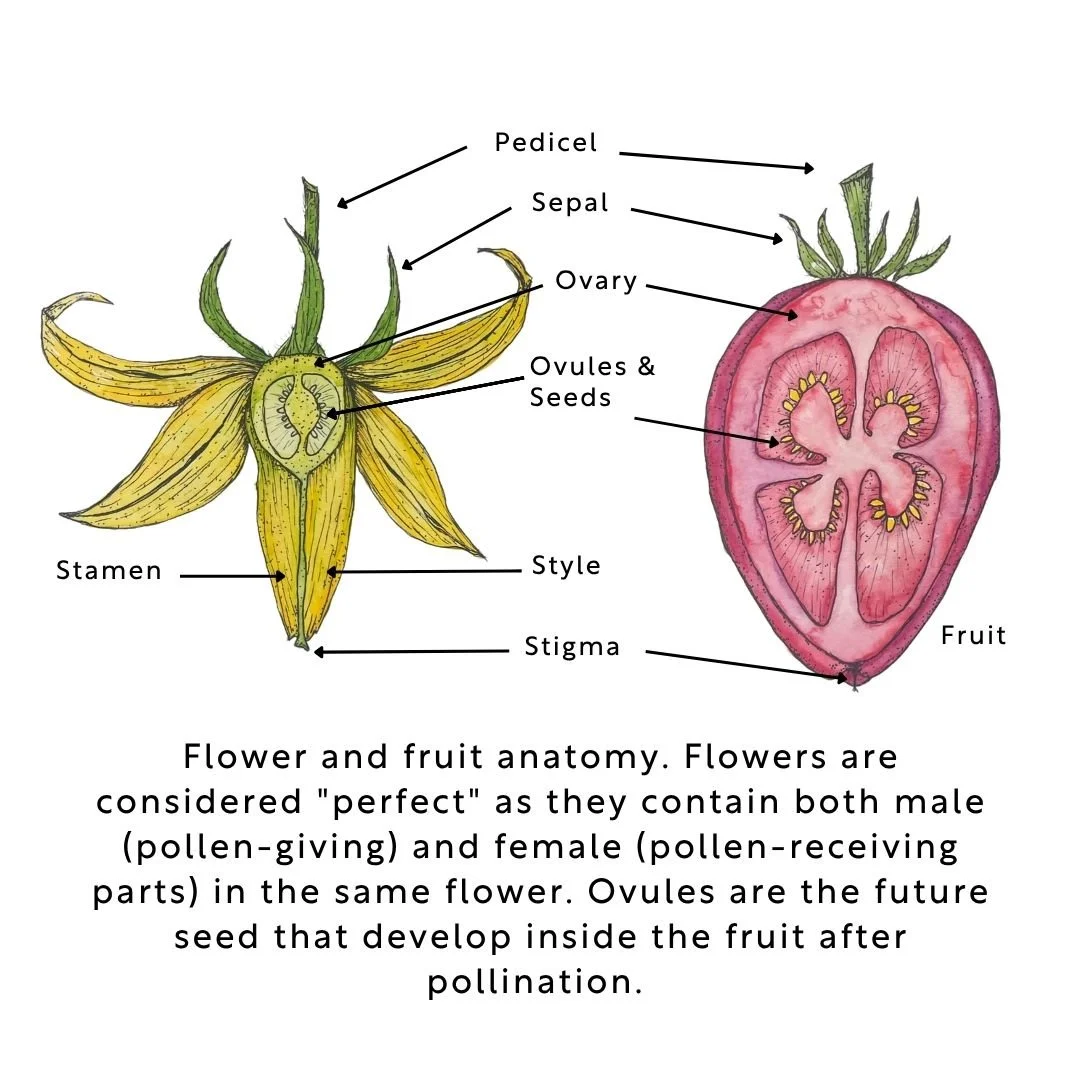
Seed Saving
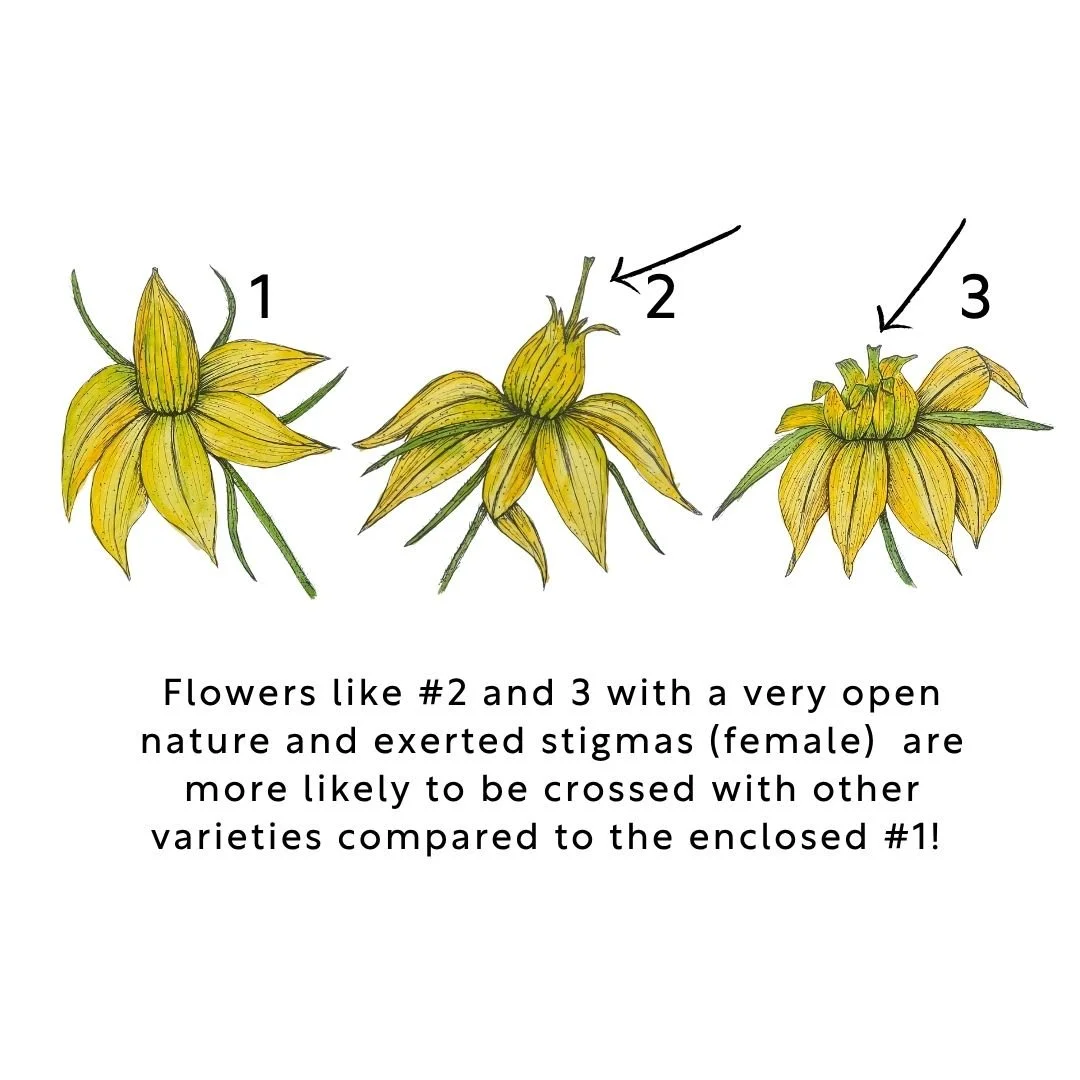
Tomatoes are generally self-pollinated, but their ability to cross with other tomatoes really depends on the variety, flower structure, your garden ecosystem, and pollinators. If growing more than one variety, a good practice is to save from the earliest fruits before insects notice the flowers or isolate by distance or bagging individual flowers before they are mature.
-
It is recommended to save seed from as many plants as possible. While saving from a single plant will work, collecting from 5–10 plants is better, and 20 or more is ideal for maintaining genetic diversity and observing variation between individuals.
If cross-pollination is a concern, space different varieties about 10–50 feet apart. However, crossing in tomatoes varies by garden and conditions—some gardeners rarely see it, while others notice it more often. Even if varieties do cross, the seeds will still produce tomatoes, just with new and sometimes unpredictable traits, which can be a fun way to explore variation.
In most cases, it’s not something to worry about. Crossing is relatively uncommon, and even when it occurs, it can be a useful learning experience. If you want to preserve a specific variety, simply keep a backup of the original seed stock.
-
It is generally not recommended to save seeds from hybrid varieties, as they will not grow true to type. Open-pollinated varieties, on the other hand, will remain true to type and are well suited for seed saving. Unless a seed packet is labeled as an F1 hybrid, it is typically openpollinated.
When deciding what to save, focus on varieties you truly enjoy and want to grow again, those that are rare or difficult to find, and those that may improve over time through your own selection.
-
When saving seed, consider the traits you most want to preserve and improve, such as flavor, plant vigor, disease resistance, and earliness. Be intentional about your selection—save seed only from your healthiest and best-performing plants. Avoid saving from weak or less desirable plants, as seed saving is an opportunity to carry forward and strengthen the qualities you want in future generations.
-
The easiest way to save seeds is to squeeze out the contents onto a paper towel, label it with the variety and date, and let it dry. When they are fully dried, you can fold up the paper, and that’s it!
But a better way is fermentation. It cleans up the seed, removes the sticky gel coat, and makes them much easier to handle when planting next season. Paper-saved seeds will stick to the paper and have to be scraped off. Fermented seeds will be loose and ready to go.
Fermentation typically takes 24–72 hours, and a layer of mold forming on top is a normal sign that the process is working. During this time, viable seeds will sink, while non-viable seeds float along with the pulp and gelatinous coating that separates from each seed. Stir a couple of times a day, especially for jars that float a lot of material to the top, trapping seeds. In Florida, no longer than 3 days is best, as any longer, especially in warm conditions could damage the seeds.
Fermentation can become stinky, so it helps to cover the container with a cloth or towel, which also deters fruit flies.
When fermentation is complete, pour off the floating seeds and gunk. Add fresh water and repeat this decanting process a few times until the water runs clear. Then rinse the seeds thoroughly over a fine colander or sieve small enough to not let seeds pass through.
Spread them out to dry on a cloth napkin, coffee filter, or paper plate —avoid paper towels or newspaper, as seeds tend to stick to them. Every day, separate clumped seeds by gently rubbing them in between your fingers.
Once fully dry, label storage envelopes with the variety, year, and any relevant notes, and store them in a cool, dark, and dry location. Seeds kept in these conditions will last for many years. It is not necessary to freeze or refrigerate them.
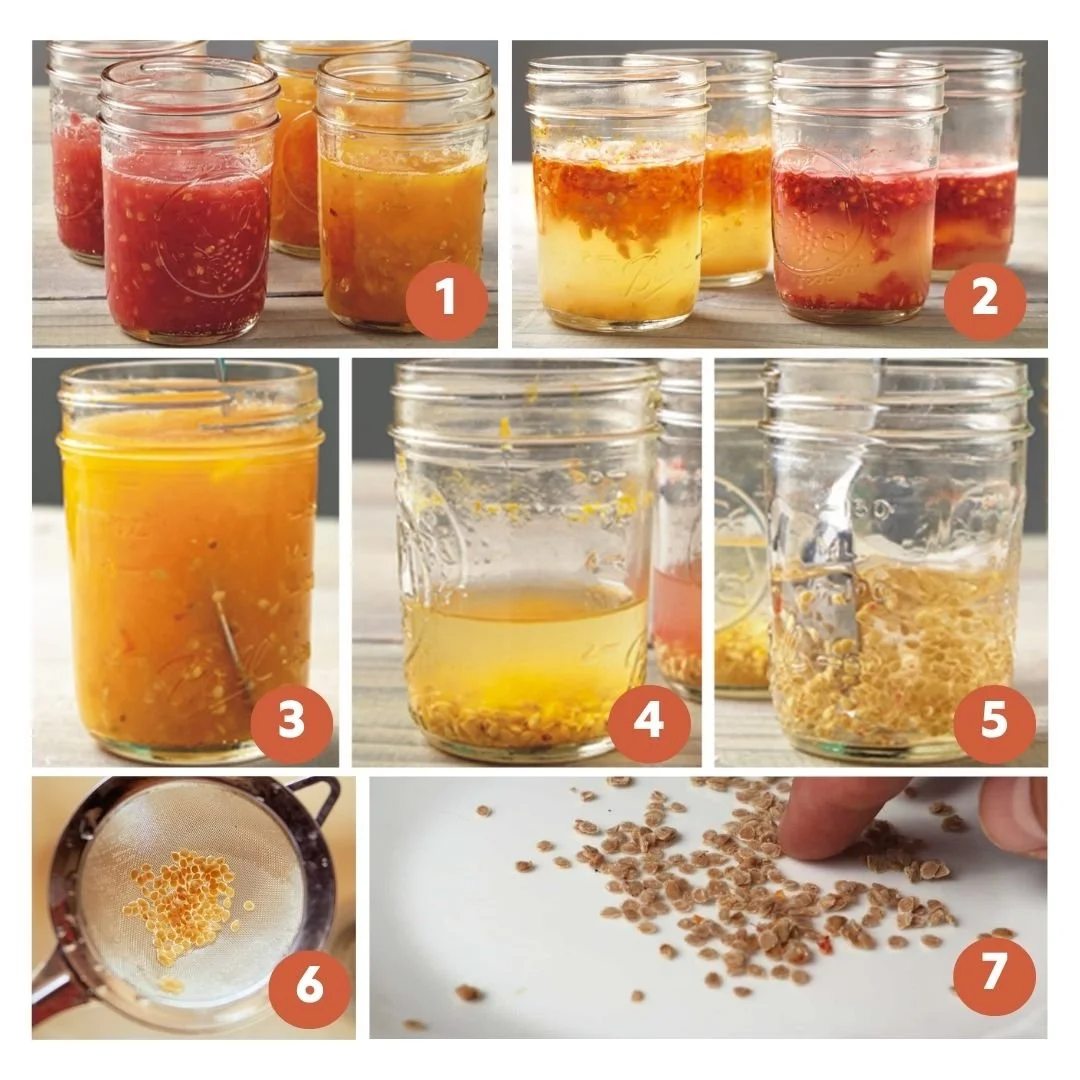
Seed Fermentation
Squeezed seeds are left to ferment in clear jars. Add water if tomatoes are not juicy.
Wait for fermentation to occur and observe natural mold on top, and separation of materials.
Stir at least daily.
Rinse, decant, repeat. Pouring off mold, gunk and floating seeds.
Clean seeds and water remain.
Rinse and strain through a fine sieve.
Spread out to dry and shuffle them around daily to separate clusters and facilitate even and individual drying.